
Review for The Novel Factory:
Today I’d like to talk about a piece of software I began using late 2016. I stumbled upon it on Kboards when I was looking for new writing software once my Scrivener trial was used up. It was the end of the world in my mind – how could I ever survive without it? But I saw Novel Factory and it was the dude in the heavy leather jacket and a great big gun, so I knew I was in good hands. This is an honest review of the software as I have experienced it, and I only endorse products I use.
Immediately upon opening the program, you can choose to start a new novel, existing novel, or last save. I clicked on last save and it opened into the Star Dog prequel that I’ve been working on, and that will serve as the example throughout this review.
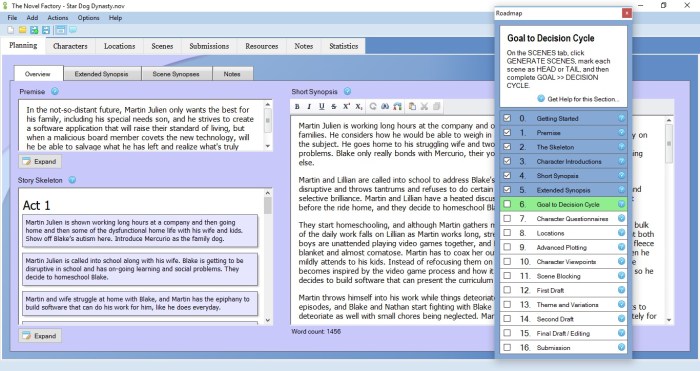
Now, first I want to bring your attention to the pop-up panel on the right that’s labeled “Road Map”. You can use this religiously, or you can totally exit it and ignore it. (You can always get it back from the Actions Dropdown > Show Roadmap). One of the things I adore about the software is how flexible it is – follow the map, or go your own way. I started following the map just to see how everything worked, and I can tell you that everything you do builds on each other. If you struggle with plotting, this hand in hand leading can be really helpful.
You start with the premise, and you can click on the “Expand” button to bring up a window.

As you can see, I used the list of elements to create the premise in my mind even though I didn’t sit down and do it step by step. I think I got it though, right? I circled in red the Help button, and there’s one of these for basically every facet of the software, and clicking them brings up a neat little article on what that feature does. They’re well-written and can be humorous too, so sometimes I read them just for enjoyment.
Next, we move on to the Story Skeleton part just below the Premise. When you open up the software fresh, you have the option for choosing a template among the following: The Hero’s Journey, Detective Noir, Romance, Universal, and Mystery. These all have some barebones outlines (a couple of them have more depth than others) for each genre and from what I can see they all have some good starts.
Here’s where the flexibility I mentioned above comes into play again and this is my favorite feature, but we can make our own templates. As you can see from the screenshot below, you can add stages and acts and edit them, and then save that as your custom template to load again later. I created the No Pants Outline template from Libbie Hawker’s book “Take Off Your Pants”, since that is what I was experimenting with when I outlined my prequel, and now I can reuse that template easily whenever I please.

Here’s where everything starts building on each other. I skipped the character introductions part and came back to it later since I knew the characters well enough from the first book, and I knew what I wanted. Instead, I went right from the Story Skeleton to the Short Synopsis, which is where you look at each snippet of your skeleton and you start expanding it from a sentence or two into a flesh-out paragraph per item on the skeleton. I worked through it all the way down until I had filled in the Short Synopsis bit. Then, it’s time to do the Extended Synopsis, and then you go into a new tab, like below.

Everything you typed in the Short Synopsis box in the previous tab will automatically show up here on the left, and now for the Extended Synopsis, you expand every bit of it again with more details and nuance. Again, the Help articles are really helpful here to give you ideas on how you’re supposed to be shaping your story. A bulk of your work and ideas are going into the Extended Synopsis now that you have free reign, and that’s important because this what your Scenes will be generated from, as seen below.

When you first get to this page, it’s blank. Then you hit the Generate Scenes button which I’ve circled in red, and a beautiful thing happens. It might be a tad laggy, so hold tight, but it pulls your Extended Synopsis into scenes (mostly based on how you spaced them in your structure). Then you can edit the scenes based on the Goals > Decision cycle, which is best explained in their Help Article. It might be best to read that in-depth first, so you can keep all that in mind when writing at least your Extended Synopsis. I didn’t, and honestly I think I did it wrong. I think I generated way too many scenes, because I can’t really classify them. This may be a flaw in my writing, and if I had to do it again, I would be changing how I structured it.
While I did follow my original outline, I struggled with picking out the goal and conflict in each scene, because sometimes the resolution for a disaster didn’t happen until much later in the story. My book wasn’t that clean, and while I’m a little worried about what that may say about my writing, I feel like it still works. Maybe I just didn’t want to fill in all those little bits because I had most of it in my head from earlier, and that’s fine too. When your scenes are done and structured how you want them, you can click on the magnifying glass in the top right corner of each scene – right by the head/tails/incident coins (purple, red, blue).
That takes us into each scene’s information as seen below, which has more tabs and more ways to track all the little details that might otherwise get lost and create inconsistencies. I didn’t get to play with this as much as I wanted to, but this is also where all the writing occurs, and thus you can write your way through each scene. I like this because it’s easy to track the progress in bite-sized pieces.

If you went back and filled in the worksheets provided in the Characters and Locations tab (the big ones next to the Planning Tab in the main screen), then you have the option to Add Existing Characters and Add Existing Locations in the Scene tab as shown in the screenshot, or you can add new ones right there. I was surprised to see just how much of this software was interconnected, and it really streamlines the process.
Next, you’re taken to Scene Blocking, and like how you expanded from the skeleton to the extended synopsis, this is another train of expanding from blocking to Final Draft. In each tab you visit in between, you have a handy button to paste from the previous tab so that you can keep working forward but keeping your versions separate and clean just in case you need to, and along the left panel your characters and locations are handy to reference throughout your writing.
From Scene Blocking to Final Draft there is a basic text editor with everything you’ll need in the software that you can also Full Screen to write without distractions. It’s basic and simple, and in this case that’s an asset. When you’re done working on a scene, you click the little save button in that window and click Next, and you’re automatically taken to the next scene to begin the process again.
This is the last part, and I regret I haven’t actually been writing in the software long enough to generate any good statistics, because this is a page that sets my heart racing. I’m still discovering a lot of the software too, as the admins have been gracious enough to extend my trial due my real life not aligning with my writing time. So, this screenshot is data free, but can you imagine those delicious charts filled up with how productive you are?
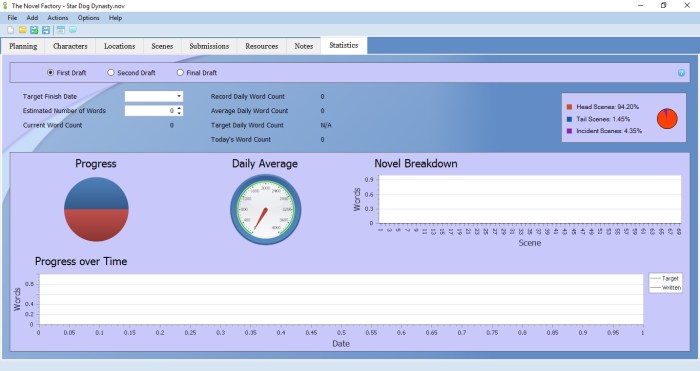
You can set your project finish date that you’re aiming for and the target number of words and a pie chart will slowly close in as you write towards your goal, and you’ll see the breakdown of your daily words, words per scene, and target vs written towards your goal date. I played around with the parameters and put in some dummy numbers just to see how the charts changed instantly to reflect it. As you can see, it also tracks First, Second, and Final Draft tabs separately. I can’t wait to explore this further with a later project of mine. As Chris Fox says, “What can be tracked, can be improved.”
When you’re done, it exports as a whole or in part (Planning, Characters, Notes, etc.) to Word, Scrivener, or as a finished ePub. I didn’t get to test the ePub export yet as I would have to restructure before I copy and paste just to see it, but I imagine it’s the basics to get you started in compiling a finished product. There’s room for improvement and they’re working on it.
In conclusion, The Novel Factory is a solid piece of software that I recommend for any stage of writing. From what I read on Kboards and on their website, I got the impression that it’s always being worked on and improved, and the admins seem to be very responsive. My one and only complaint is that it can be laggy at times, but it is lightweight to open.
Thanks for reading and I’ll be happy to address any questions if you want to message me. Happy writing!
“We are a participant in the Amazon Services LLC Associates Program, an affiliate advertising program designed to provide a means for us to earn fees by linking to Amazon.com and affiliated sites.”
